


Popular routes
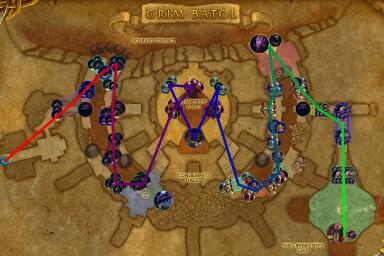
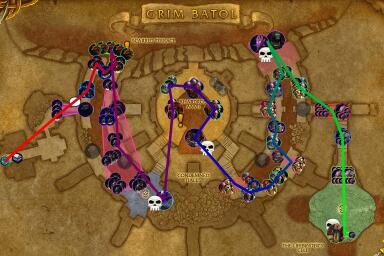
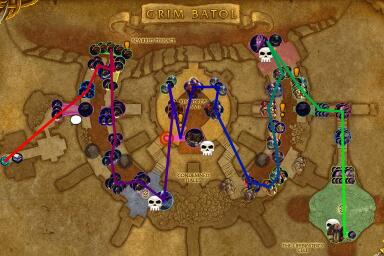
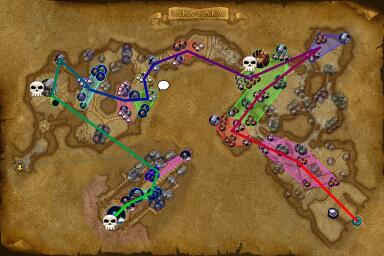
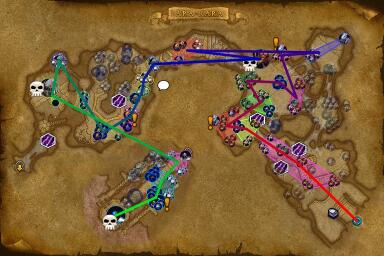
Grim Batol
The Weekly Route Series showcases Mythic+ strategies that are tailored towards the Beginner and Intermediate levels of Mythic+. In other words, the following route imports are designed with the following criteria in mind:
Easy to execute - particularly in pick-up-groups (PUGs)
Good tradeoffs between skipping the most difficult enemy forces while not requiring overly complicated strategies or “tech” to do so.
Come say hi at twitch.tv/thebunten
100%
 bunten#4358
The Weekly Route Series showcases Mythic+ strategies that are tailored towards the Beginner and Intermediate levels of Mythic+. In other words, the following route imports are designed with the following criteria in mind:
Easy to execute - particularly in pick-up-groups (PUGs)
Good tradeoffs between skipping the most difficult enemy forces while not requiring overly complicated strategies or “tech” to do so.
Come say hi at twitch.tv/thebunten
100%
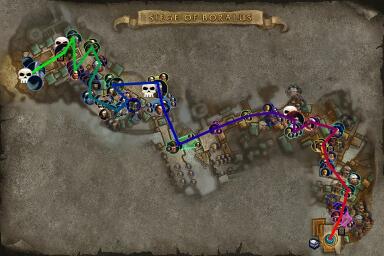
Siege of Boralus
The Weekly Route Series showcases Mythic+ strategies that are tailored towards the Beginner and Intermediate levels of Mythic+. In other words, the following route imports are designed with the following criteria in mind:
Easy to execute - particularly in pick-up-groups (PUGs)
Good tradeoffs between skipping the most difficult enemy forces while not requiring overly complicated strategies or “tech” to do so.
Come say hi at twitch.tv/thebunten
100%
Mists of Tirna Scithe
The Weekly Route Series showcases Mythic+ strategies that are tailored towards the Beginner and Intermediate levels of Mythic+. In other words, the following route imports are designed with the following criteria in mind:
Easy to execute - particularly in pick-up-groups (PUGs)
Good tradeoffs between skipping the most difficult enemy forces while not requiring overly complicated strategies or “tech” to do so.
Come say hi at twitch.tv/thebunten
101%
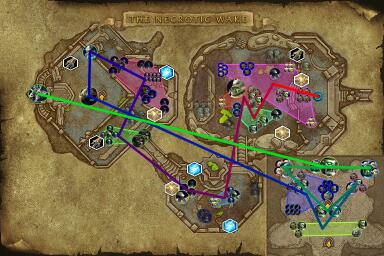
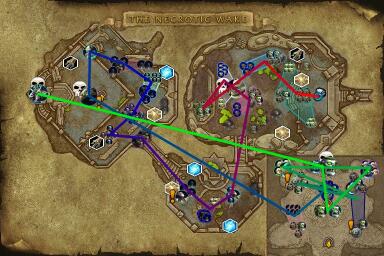
The Necrotic Wake
The Weekly Route Series showcases Mythic+ strategies that are tailored towards the Beginner and Intermediate levels of Mythic+. In other words, the following route imports are designed with the following criteria in mind:
Easy to execute - particularly in pick-up-groups (PUGs)
Good tradeoffs between skipping the most difficult enemy forces while not requiring overly complicated strategies or “tech” to do so.
Come say hi at twitch.tv/thebunten
100%
Ara-Kara: City of Echoes
The Weekly Route Series showcases Mythic+ strategies that are tailored towards the Beginner and Intermediate levels of Mythic+. In other words, the following route imports are designed with the following criteria in mind:
Easy to execute - particularly in pick-up-groups (PUGs)
Good tradeoffs between skipping the most difficult enemy forces while not requiring overly complicated strategies or “tech” to do so.
Come say hi at twitch.tv/thebunten
100%
City of Threads
The Weekly Route Series showcases Mythic+ strategies that are tailored towards the Beginner and Intermediate levels of Mythic+. In other words, the following route imports are designed with the following criteria in mind:
Easy to execute - particularly in pick-up-groups (PUGs)
Good tradeoffs between skipping the most difficult enemy forces while not requiring overly complicated strategies or “tech” to do so.
Come say hi at twitch.tv/thebunten
103%
The Weekly Route Series showcases Mythic+ strategies that are tailored towards the Beginner and Intermediate levels of Mythic+. In other words, the following route imports are designed with the following criteria in mind:
Easy to execute - particularly in pick-up-groups (PUGs)
Good tradeoffs between skipping the most difficult enemy forces while not requiring overly complicated strategies or “tech” to do so.
Come say hi at twitch.tv/thebunten
101%
The Weekly Route Series showcases Mythic+ strategies that are tailored towards the Beginner and Intermediate levels of Mythic+. In other words, the following route imports are designed with the following criteria in mind:
Easy to execute - particularly in pick-up-groups (PUGs)
Good tradeoffs between skipping the most difficult enemy forces while not requiring overly complicated strategies or “tech” to do so.
Come say hi at twitch.tv/thebunten
103%
The Weekly Route Series showcases Mythic+ strategies that are tailored towards the Beginner and Intermediate levels of Mythic+. In other words, the following route imports are designed with the following criteria in mind:
Easy to execute - particularly in pick-up-groups (PUGs)
Good tradeoffs between skipping the most difficult enemy forces while not requiring overly complicated strategies or “tech” to do so.
Come say hi at twitch.tv/thebunten
103%
The Dawnbreaker
The Weekly Route Series showcases Mythic+ strategies that are tailored towards the Beginner and Intermediate levels of Mythic+. In other words, the following route imports are designed with the following criteria in mind:
Easy to execute - particularly in pick-up-groups (PUGs)
Good tradeoffs between skipping the most difficult enemy forces while not requiring overly complicated strategies or “tech” to do so.
Come say hi at twitch.tv/thebunten
100%
The Stonevault

The Weekly Route Series showcases Mythic+ strategies that are tailored towards the Beginner and Intermediate levels of Mythic+. In other words, the following route imports are designed with the following criteria in mind:
Easy to execute - particularly in pick-up-groups (PUGs)
Good tradeoffs between skipping the most difficult enemy forces while not requiring overly complicated strategies or “tech” to do so.
Come say hi at twitch.tv/thebunten
102%

The Weekly Route Series showcases Mythic+ strategies that are tailored towards the Beginner and Intermediate levels of Mythic+. In other words, the following route imports are designed with the following criteria in mind:
Easy to execute - particularly in pick-up-groups (PUGs)
Good tradeoffs between skipping the most difficult enemy forces while not requiring overly complicated strategies or “tech” to do so.
Come say hi at twitch.tv/thebunten
100%

The Weekly Route Series showcases Mythic+ strategies that are tailored towards the Beginner and Intermediate levels of Mythic+. In other words, the following route imports are designed with the following criteria in mind:
Easy to execute - particularly in pick-up-groups (PUGs)
Good tradeoffs between skipping the most difficult enemy forces while not requiring overly complicated strategies or “tech” to do so.
Come say hi at twitch.tv/thebunten
102%
Popular routes by current affixes
Xal'atath's Bargain: Pulsar
Tyrannical
Fortified
Xal'atath's Guile
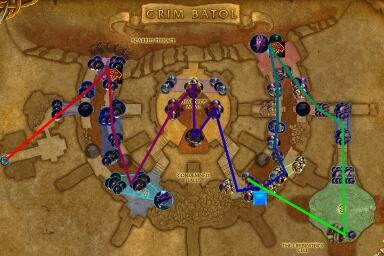
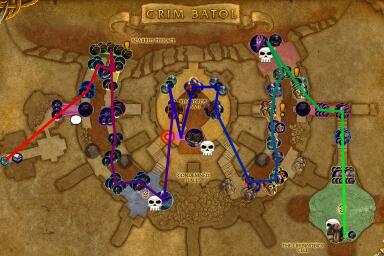
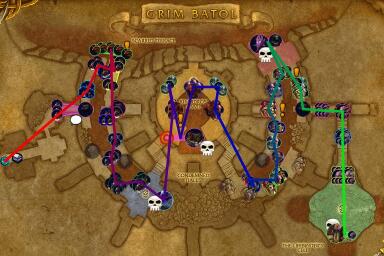
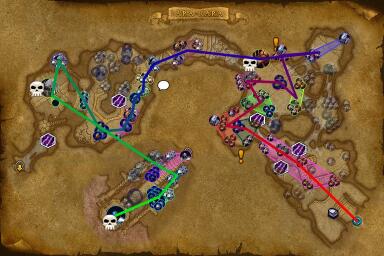
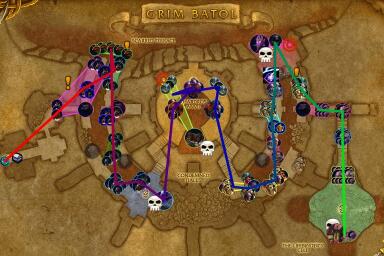
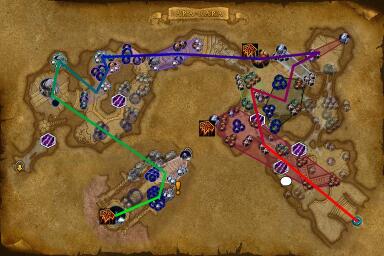
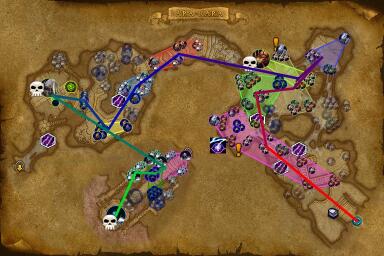
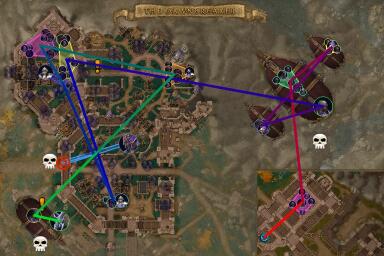
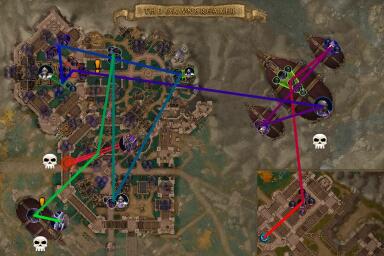
Grim Batol
The Weekly Route Series showcases Mythic+ strategies that are tailored towards the Beginner and Intermediate levels of Mythic+. In other words, the following route imports are designed with the following criteria in mind:
Easy to execute - particularly in pick-up-groups (PUGs)
Good tradeoffs between skipping the most difficult enemy forces while not requiring overly complicated strategies or “tech” to do so.
Come say hi at twitch.tv/thebunten
100%
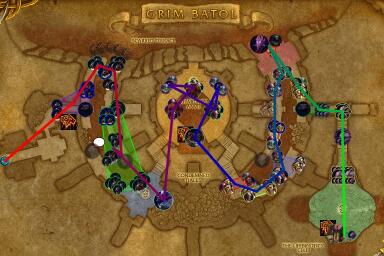
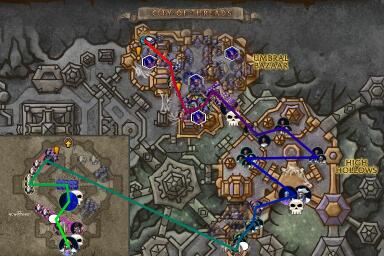
This is a basic and straightforward route in Grim Batol. Read the notes for more info!
100%
 VitaminP#11358
Use this route in a +12 and up. It's a strong route for high keys in this dungeon
100%
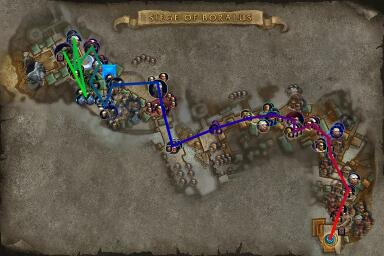
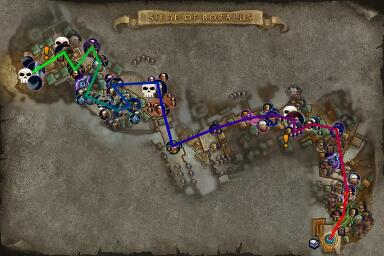
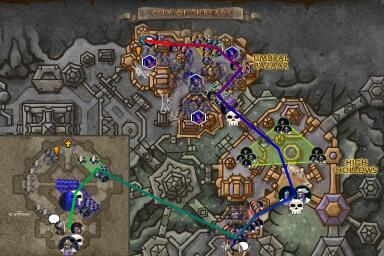
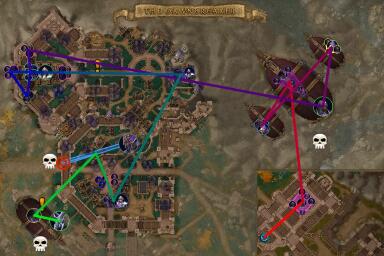
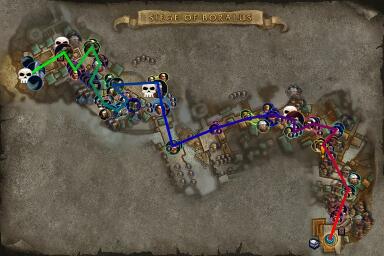
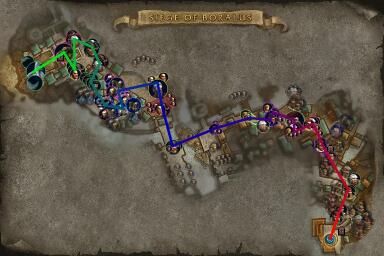
Siege of Boralus
The Weekly Route Series showcases Mythic+ strategies that are tailored towards the Beginner and Intermediate levels of Mythic+. In other words, the following route imports are designed with the following criteria in mind:
Easy to execute - particularly in pick-up-groups (PUGs)
Good tradeoffs between skipping the most difficult enemy forces while not requiring overly complicated strategies or “tech” to do so.
Come say hi at twitch.tv/thebunten
100%
The Weekly Route Series showcases Mythic+ strategies that are tailored towards the Beginner and Intermediate levels of Mythic+. In other words, the following route imports are designed with the following criteria in mind:
Easy to execute - particularly in pick-up-groups (PUGs)
Good tradeoffs between skipping the most difficult enemy forces while not requiring overly complicated strategies or “tech” to do so.
Come say hi at twitch.tv/thebunten
100%
Groups planning to do content in the +2 to +11 range should plan to use this route, as it closely reflects popular pulls. As groups move into intermediate keys in the +12 to +15 range, they begin skipping the big Ashvane Sniper pack before Hadal, so plan out ways your group may accomplish this skip if you plan on moving up!
100%
 Cleon#3109
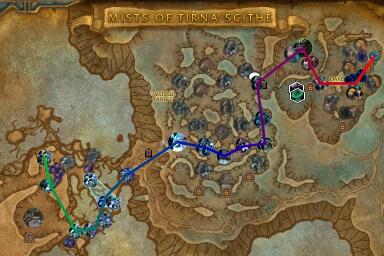
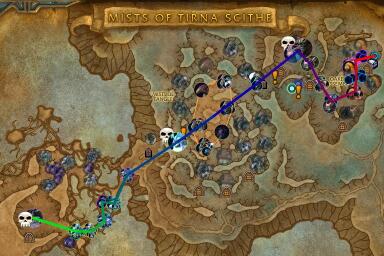
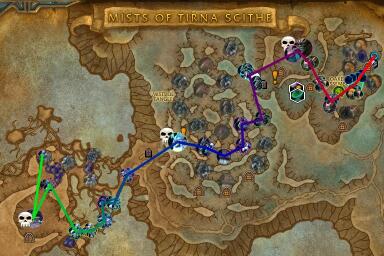
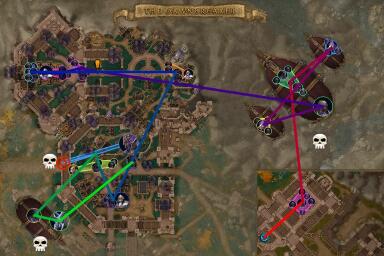
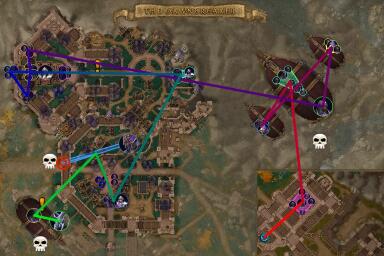
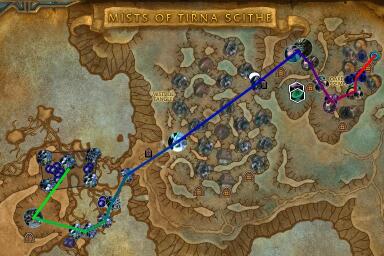
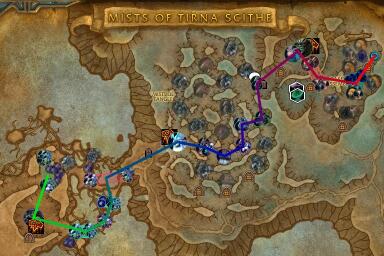
Mists of Tirna Scithe
The Weekly Route Series showcases Mythic+ strategies that are tailored towards the Beginner and Intermediate levels of Mythic+. In other words, the following route imports are designed with the following criteria in mind:
Easy to execute - particularly in pick-up-groups (PUGs)
Good tradeoffs between skipping the most difficult enemy forces while not requiring overly complicated strategies or “tech” to do so.
Come say hi at twitch.tv/thebunten
101%
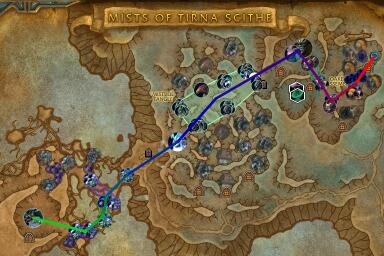
All my routes are simple enough for everyone to get them done right in time up to +10, even for new people who wants to tank for the first time (if your item level allows you to)
100%
 Flaregood
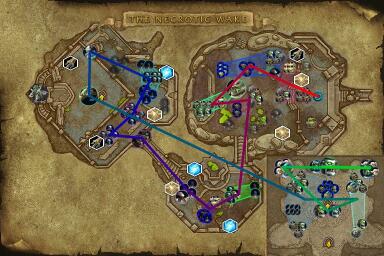
The Necrotic Wake
The Weekly Route Series showcases Mythic+ strategies that are tailored towards the Beginner and Intermediate levels of Mythic+. In other words, the following route imports are designed with the following criteria in mind:
Easy to execute - particularly in pick-up-groups (PUGs)
Good tradeoffs between skipping the most difficult enemy forces while not requiring overly complicated strategies or “tech” to do so.
Come say hi at twitch.tv/thebunten
100%
The Weekly Route Series showcases Mythic+ strategies that are tailored towards the Beginner and Intermediate levels of Mythic+. In other words, the following route imports are designed with the following criteria in mind:
Easy to execute - particularly in pick-up-groups (PUGs)
Good tradeoffs between skipping the most difficult enemy forces while not requiring overly complicated strategies or “tech” to do so.
Come say hi at twitch.tv/thebunten
100%

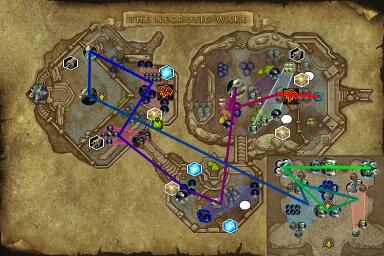
This method pulls all 3 Necromancers in the first area. Pulling them with other mobs in the area saves time and yields high percentage allowing you to skip packs later on.
101%
Ara-Kara: City of Echoes
The Weekly Route Series showcases Mythic+ strategies that are tailored towards the Beginner and Intermediate levels of Mythic+. In other words, the following route imports are designed with the following criteria in mind:
Easy to execute - particularly in pick-up-groups (PUGs)
Good tradeoffs between skipping the most difficult enemy forces while not requiring overly complicated strategies or “tech” to do so.
Come say hi at twitch.tv/thebunten
100%
Use this route for keys +2 to +11, as this is what most players are doing in PUGs in these keystone level ranges. A variation we see starting at +12 and up is that, in The Undercache section, rather than going down the middle, players are opting to go down the southwest side of the map towards the last boss, so we recommend getting accustomed to that rather than running straight down towards Ki'katal.
100%
In keystones +14 and up, players begin to start going to the South pathway after the 1st boss, so it's good to start doing that in +12 and +13 as well to prepare you for increasingly higher keystones. We suggest skipping the last pack before the 2nd boss and taking the Southeast path towards the final boss.
100%
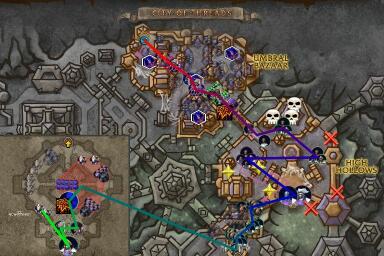
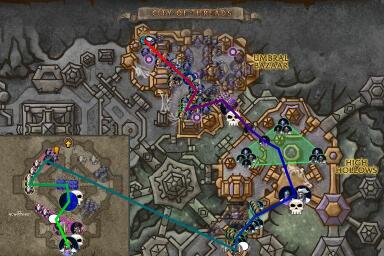
City of Threads
The Weekly Route Series showcases Mythic+ strategies that are tailored towards the Beginner and Intermediate levels of Mythic+. In other words, the following route imports are designed with the following criteria in mind:
Easy to execute - particularly in pick-up-groups (PUGs)
Good tradeoffs between skipping the most difficult enemy forces while not requiring overly complicated strategies or “tech” to do so.
Come say hi at twitch.tv/thebunten
101%
The Weekly Route Series showcases Mythic+ strategies that are tailored towards the Beginner and Intermediate levels of Mythic+. In other words, the following route imports are designed with the following criteria in mind:
Easy to execute - particularly in pick-up-groups (PUGs)
Good tradeoffs between skipping the most difficult enemy forces while not requiring overly complicated strategies or “tech” to do so.
Come say hi at twitch.tv/thebunten
103%
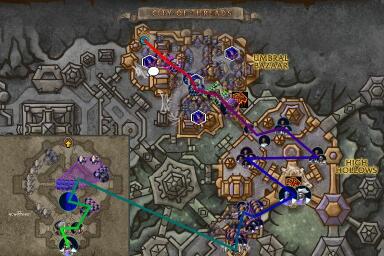
This is the simplest route for a +2 to +11 keystone where you don't really skip anything except walking around the first 2 mobs to begin Pull 1 (with or without the Queen Ansurek Shadecaster buff just depending on your group composition). This is what most players are doing in this dungeon at these keystone levels, according to Mythic+ Heatmaps data on Raider.IO
101%
Use this route to make use of the Queen Ansurek Shadecaster buffs. Make sure you have suitable classes to do the skip towards the 1st boss where you dodge the Patrol, grab the 2nd Shadecaster buff, and head to the first boss with Bloodlust. In the final boss room, hug the wall and carefully pull the 2nd miniboss first with the 2 casters to the side since it makes better use of your cooldown timings after the 3rd boss.
101%

The Dawnbreaker
The Weekly Route Series showcases Mythic+ strategies that are tailored towards the Beginner and Intermediate levels of Mythic+. In other words, the following route imports are designed with the following criteria in mind:
Easy to execute - particularly in pick-up-groups (PUGs)
Good tradeoffs between skipping the most difficult enemy forces while not requiring overly complicated strategies or “tech” to do so.
Come say hi at twitch.tv/thebunten
100%
The Weekly Route Series showcases Mythic+ strategies that are tailored towards the Beginner and Intermediate levels of Mythic+. In other words, the following route imports are designed with the following criteria in mind:
Easy to execute - particularly in pick-up-groups (PUGs)
Good tradeoffs between skipping the most difficult enemy forces while not requiring overly complicated strategies or “tech” to do so.
Come say hi at twitch.tv/thebunten
101%
Use this route in a +16 and up if you want to play like some of the highest key pushers! Verified by Yuumie-Tichondrius and shown in the data from Mythic+ Heatmaps on Raider.IO.
100%
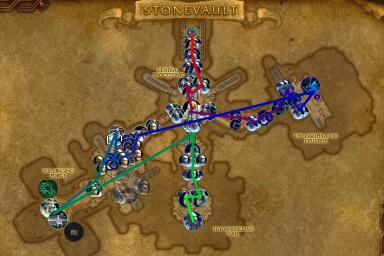
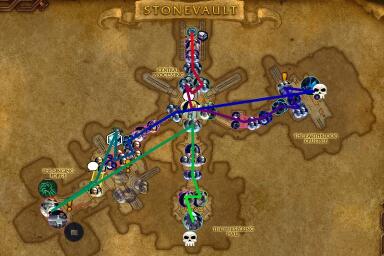
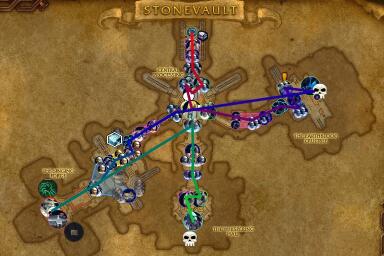
The Stonevault
The Weekly Route Series showcases Mythic+ strategies that are tailored towards the Beginner and Intermediate levels of Mythic+. In other words, the following route imports are designed with the following criteria in mind:
Easy to execute - particularly in pick-up-groups (PUGs)
Good tradeoffs between skipping the most difficult enemy forces while not requiring overly complicated strategies or “tech” to do so.
Come say hi at twitch.tv/thebunten
100%
The Weekly Route Series showcases Mythic+ strategies that are tailored towards the Beginner and Intermediate levels of Mythic+. In other words, the following route imports are designed with the following criteria in mind:
Easy to execute - particularly in pick-up-groups (PUGs)
Good tradeoffs between skipping the most difficult enemy forces while not requiring overly complicated strategies or “tech” to do so.
Come say hi at twitch.tv/thebunten
102%
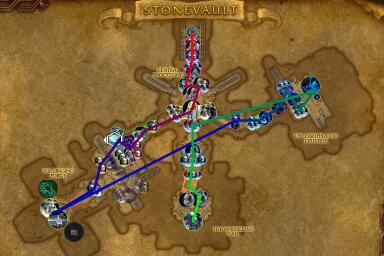
All my routes are simple enough for everyone to get them done right in time up to +10, even for new people who wants to tank for the first time (if your item level allows you to)
100%
Popular routes by next affixes
Xal'atath's Bargain: Ascendant
Fortified
Tyrannical
Xal'atath's Guile
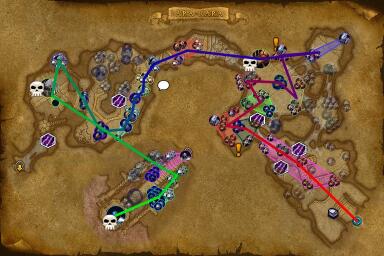
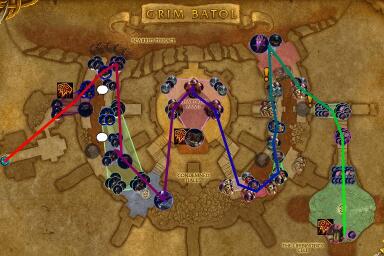
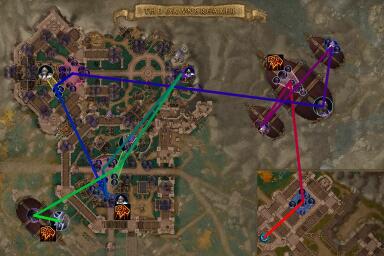
Grim Batol
The Weekly Route Series showcases Mythic+ strategies that are tailored towards the Beginner and Intermediate levels of Mythic+. In other words, the following route imports are designed with the following criteria in mind:
Easy to execute - particularly in pick-up-groups (PUGs)
Good tradeoffs between skipping the most difficult enemy forces while not requiring overly complicated strategies or “tech” to do so.
Come say hi at twitch.tv/thebunten
100%
The Weekly Route Series showcases Mythic+ strategies that are tailored towards the Beginner and Intermediate levels of Mythic+. In other words, the following route imports are designed with the following criteria in mind:
Easy to execute - particularly in pick-up-groups (PUGs)
Good tradeoffs between skipping the most difficult enemy forces while not requiring overly complicated strategies or “tech” to do so.
Come say hi at twitch.tv/thebunten
100%
This is a basic and straightforward route in Grim Batol. Read the notes for more info!
100%
Use this route in a +12 and up. It's a strong route for high keys in this dungeon
100%
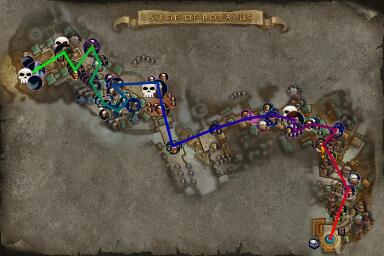
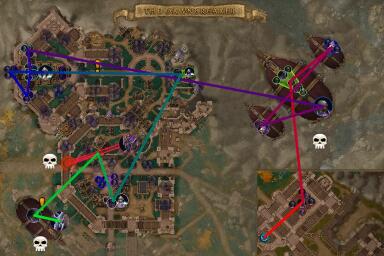
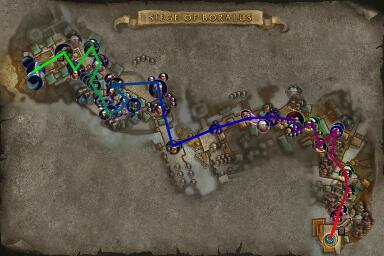
Siege of Boralus
The Weekly Route Series showcases Mythic+ strategies that are tailored towards the Beginner and Intermediate levels of Mythic+. In other words, the following route imports are designed with the following criteria in mind:
Easy to execute - particularly in pick-up-groups (PUGs)
Good tradeoffs between skipping the most difficult enemy forces while not requiring overly complicated strategies or “tech” to do so.
Come say hi at twitch.tv/thebunten
100%
The Weekly Route Series showcases Mythic+ strategies that are tailored towards the Beginner and Intermediate levels of Mythic+. In other words, the following route imports are designed with the following criteria in mind:
Easy to execute - particularly in pick-up-groups (PUGs)
Good tradeoffs between skipping the most difficult enemy forces while not requiring overly complicated strategies or “tech” to do so.
Come say hi at twitch.tv/thebunten
100%
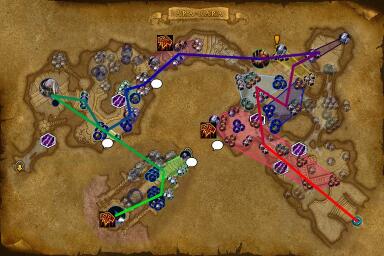
Groups planning to do content in the +2 to +11 range should plan to use this route, as it closely reflects popular pulls. As groups move into intermediate keys in the +12 to +15 range, they begin skipping the big Ashvane Sniper pack before Hadal, so plan out ways your group may accomplish this skip if you plan on moving up!
100%
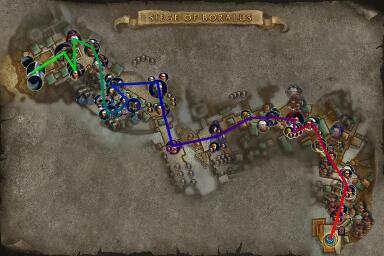
This is an intermediate route suitable for groups ready to move into +12 to +15 level keys. You'll be skipping the big Spotter/Sniper pack before Hadal now, but as you move into +16s and above, be prepared to do a larger pull at the start of the dungeon in order to skip some of the more painful mobs in the streets leading up to Chopper Redhook.
100%
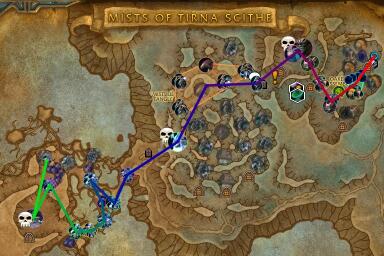
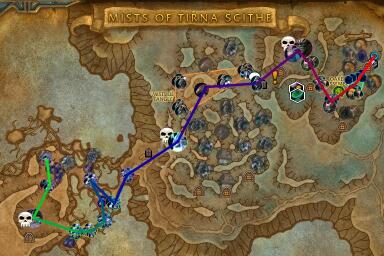
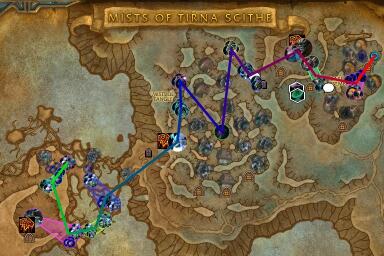
Mists of Tirna Scithe
The Weekly Route Series showcases Mythic+ strategies that are tailored towards the Beginner and Intermediate levels of Mythic+. In other words, the following route imports are designed with the following criteria in mind:
Easy to execute - particularly in pick-up-groups (PUGs)
Good tradeoffs between skipping the most difficult enemy forces while not requiring overly complicated strategies or “tech” to do so.
Come say hi at twitch.tv/thebunten
101%
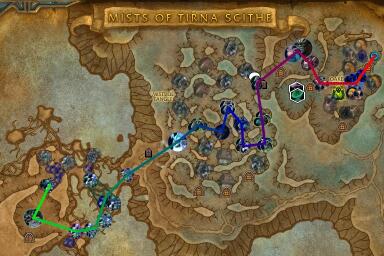
Groups up through +13s will want to use this route, though remember that the maze is completely random and you may need to pull more or less trash after Tred'ova to compensate for your actual maze count! When prepping to move up into +14s, groups opt to skip the first Spinemaw Staghorn pack at the bottom of the waterfall and pull move after Tred'ova instead, as the Staghorn makes this pack dangerous AND pretty slow to kill.
104%

Groups pushing +14 and above should use this route, although the only substantial difference will be skipping the first Spinemaw Staghorn pack after the waterfall. Plan to pull more trash after Tred'ova to make up any count you may be missing thanks to this trash skip + maze RNG.
103%
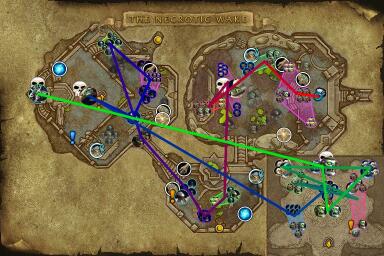
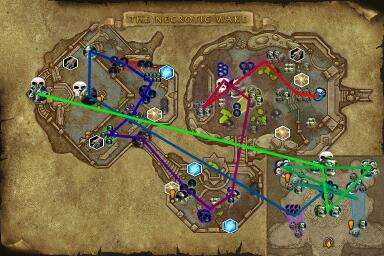
The Necrotic Wake
The Weekly Route Series showcases Mythic+ strategies that are tailored towards the Beginner and Intermediate levels of Mythic+. In other words, the following route imports are designed with the following criteria in mind:
Easy to execute - particularly in pick-up-groups (PUGs)
Good tradeoffs between skipping the most difficult enemy forces while not requiring overly complicated strategies or “tech” to do so.
Come say hi at twitch.tv/thebunten
100%
The Weekly Route Series showcases Mythic+ strategies that are tailored towards the Beginner and Intermediate levels of Mythic+. In other words, the following route imports are designed with the following criteria in mind:
Easy to execute - particularly in pick-up-groups (PUGs)
Good tradeoffs between skipping the most difficult enemy forces while not requiring overly complicated strategies or “tech” to do so.
Come say hi at twitch.tv/thebunten
100%
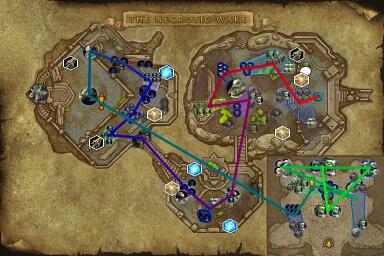
Plan to use this route if you're running +2 to +11 keys, as these are the most common pulls utilized at those key levels. At +12 and above, groups are typically opting to skip the Corpse Harvester pack in Pull 4, instead pulling the Flesh Harvester pack at the bottom of the stairs in that first room.
100%
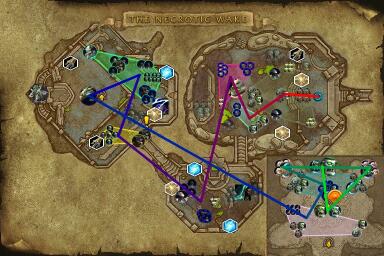
Plan to use this route if you're running +16 and above, as teams at this level are opting for different (and much larger!) pulls throughout the first floor.
100%
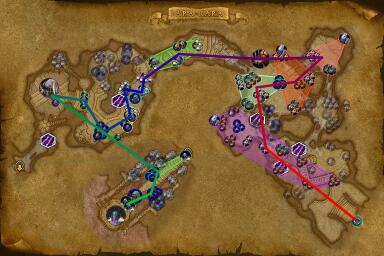
Ara-Kara: City of Echoes
The Weekly Route Series showcases Mythic+ strategies that are tailored towards the Beginner and Intermediate levels of Mythic+. In other words, the following route imports are designed with the following criteria in mind:
Easy to execute - particularly in pick-up-groups (PUGs)
Good tradeoffs between skipping the most difficult enemy forces while not requiring overly complicated strategies or “tech” to do so.
Come say hi at twitch.tv/thebunten
100%
Use this route for keys +2 to +11, as this is what most players are doing in PUGs in these keystone level ranges. A variation we see starting at +12 and up is that, in The Undercache section, rather than going down the middle, players are opting to go down the southwest side of the map towards the last boss, so we recommend getting accustomed to that rather than running straight down towards Ki'katal.
100%
In keystones +14 and up, players begin to start going to the South pathway after the 1st boss, so it's good to start doing that in +12 and +13 as well to prepare you for increasingly higher keystones. We suggest skipping the last pack before the 2nd boss and taking the Southeast path towards the final boss.
100%
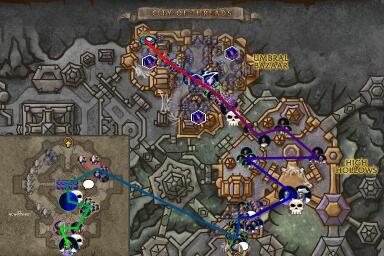
City of Threads
The Weekly Route Series showcases Mythic+ strategies that are tailored towards the Beginner and Intermediate levels of Mythic+. In other words, the following route imports are designed with the following criteria in mind:
Easy to execute - particularly in pick-up-groups (PUGs)
Good tradeoffs between skipping the most difficult enemy forces while not requiring overly complicated strategies or “tech” to do so.
Come say hi at twitch.tv/thebunten
103%
The Weekly Route Series showcases Mythic+ strategies that are tailored towards the Beginner and Intermediate levels of Mythic+. In other words, the following route imports are designed with the following criteria in mind:
Easy to execute - particularly in pick-up-groups (PUGs)
Good tradeoffs between skipping the most difficult enemy forces while not requiring overly complicated strategies or “tech” to do so.
Come say hi at twitch.tv/thebunten
101%
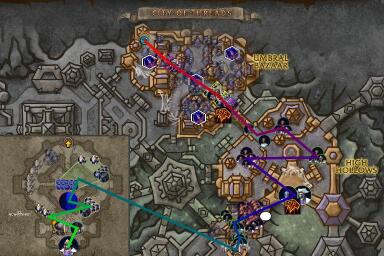
This is the simplest route for a +2 to +11 keystone where you don't really skip anything except walking around the first 2 mobs to begin Pull 1 (with or without the Queen Ansurek Shadecaster buff just depending on your group composition). This is what most players are doing in this dungeon at these keystone levels, according to Mythic+ Heatmaps data on Raider.IO
101%
Use this route to make use of the Queen Ansurek Shadecaster buffs. Make sure you have suitable classes to do the skip towards the 1st boss where you dodge the Patrol, grab the 2nd Shadecaster buff, and head to the first boss with Bloodlust. In the final boss room, hug the wall and carefully pull the 2nd miniboss first with the 2 casters to the side since it makes better use of your cooldown timings after the 3rd boss.
101%
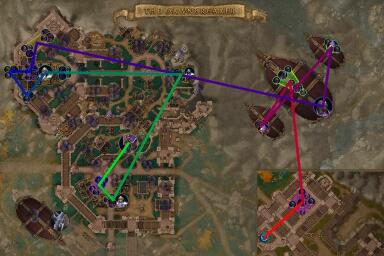
The Dawnbreaker
The Weekly Route Series showcases Mythic+ strategies that are tailored towards the Beginner and Intermediate levels of Mythic+. In other words, the following route imports are designed with the following criteria in mind:
Easy to execute - particularly in pick-up-groups (PUGs)
Good tradeoffs between skipping the most difficult enemy forces while not requiring overly complicated strategies or “tech” to do so.
Come say hi at twitch.tv/thebunten
100%
The Weekly Route Series showcases Mythic+ strategies that are tailored towards the Beginner and Intermediate levels of Mythic+. In other words, the following route imports are designed with the following criteria in mind:
Easy to execute - particularly in pick-up-groups (PUGs)
Good tradeoffs between skipping the most difficult enemy forces while not requiring overly complicated strategies or “tech” to do so.
Come say hi at twitch.tv/thebunten
101%
Use this route in a +16 and up if you want to play like some of the highest key pushers! Verified by Yuumie-Tichondrius and shown in the data from Mythic+ Heatmaps on Raider.IO.
100%
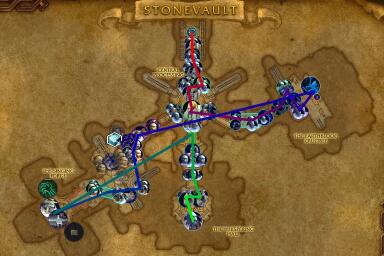
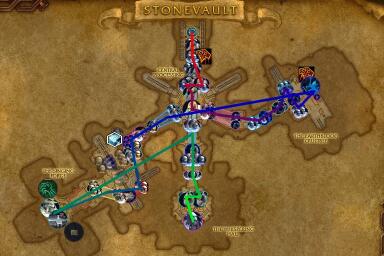
The Stonevault
The Weekly Route Series showcases Mythic+ strategies that are tailored towards the Beginner and Intermediate levels of Mythic+. In other words, the following route imports are designed with the following criteria in mind:
Easy to execute - particularly in pick-up-groups (PUGs)
Good tradeoffs between skipping the most difficult enemy forces while not requiring overly complicated strategies or “tech” to do so.
Come say hi at twitch.tv/thebunten
102%
The Weekly Route Series showcases Mythic+ strategies that are tailored towards the Beginner and Intermediate levels of Mythic+. In other words, the following route imports are designed with the following criteria in mind:
Easy to execute - particularly in pick-up-groups (PUGs)
Good tradeoffs between skipping the most difficult enemy forces while not requiring overly complicated strategies or “tech” to do so.
Come say hi at twitch.tv/thebunten
100%
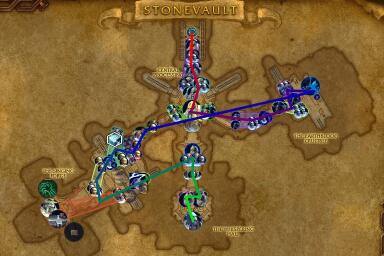
Head down this route if you're looking to replicate the pulls that high-level keyrunners are doing.
100%
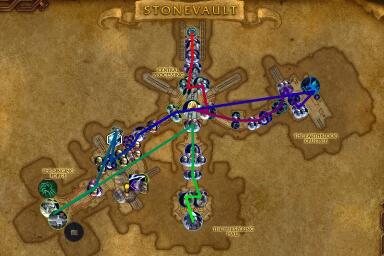
Consider using this route if you are playing keys at +11 or below; higher groups typically opt to skip the mine cart pull in the Singing Forge wing, and instead pull the more southern group of Engine Speakers, sometimes even including them in Pull 18.
102%